JustNoteIt help for Windows - how to get the most out of sticky notes
This section provides detailed instructions for using JustNoteIt on Windows 10.
How to start using JustNoteIt
Main menu
Note's menu
Note context menu (right-click menu)
JustNoteIt FAQ
How to start using Just Note It
► How to run JustNoteIt
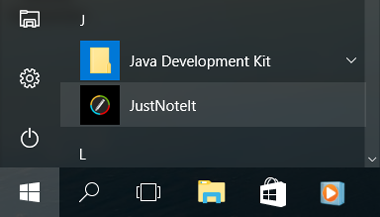
The app runs automatically. But you can also run it manually from the Start menu.
Open the Start menu and click All Apps to see the list of all installed apps. You can scroll down the apps list to find JustNoteIt or click any letter from the list, then click "J" and click JustNoteIt.
JustNoteIt resides in the system tray near the system clock. If you do not see the tray icon, click the arrow in the Notification area to show hidden tray icons.
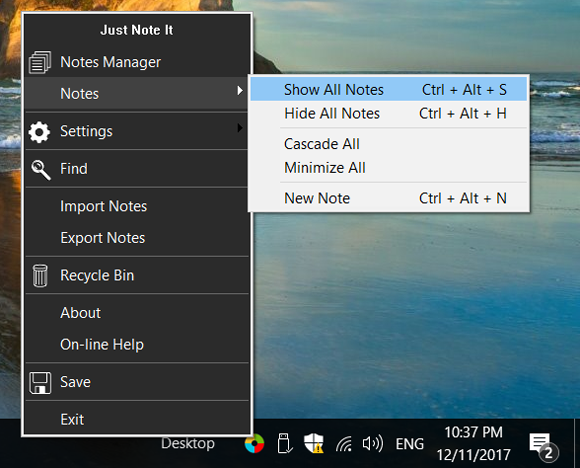
Click the tray icon to quickly access the Main menu.
Once you run the program, you can create, color, resize, format and customize notes the way you wish.
By default, every time you run the program it automatically opens the Notes Manager window that shows a list of your notes and reminders. You may disable the
"Open Notes Manager on startup" option in the
App's Settings.
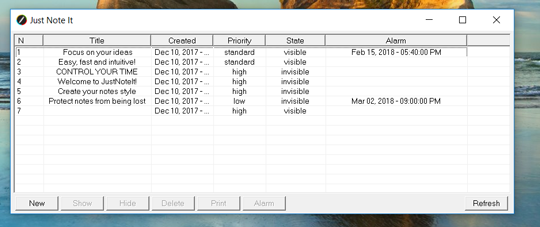
In the Notes Manager window you can add, show, hide, delete and print notes or set reminders.
 ▲
▲
To create a new note: press Ctrl + Alt + N or double-click on the tray icon next to the system clock or click "New" in the
Notes Manager.
▲
► How to set a reminder
Click on the
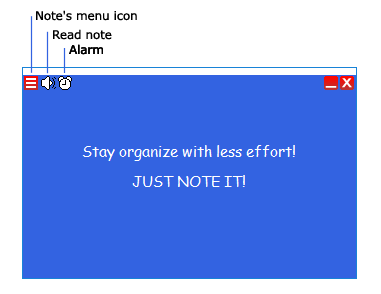
Alarm icon in the upper-left corner of the note or select the note in the
Notes Manager window and click the "Alarm" button.
- Set the date and time.
- You may select to repeat the reminder every Monday, Tuesday, etc. or every day.
- Enable or disable snooze. By default, snooze is off. Snooze interval is 9 minutes.
- Select alarm actions.
Once you have set up the reminder options, click OK.
You can see information about the Alarm state and time in the alarm icon's tooltip and in the Notes Manager.
If you set an alarm without snooze, you can stop it by clicking 'stop alarm'.
If you selected snooze while setting up your reminder, you can stop it by clicking 'stop alarm' or snooze it by clicking 'SNOOZE'.
'Flash + Popup' lasts for 1 minute.
Beep sounds once.
Repeated reminders stay active until you disable them. To disable a reminder select Alarm Off in the Alarm settings window.
▲
► Formatting options
JustNoteIt offers a range of formatting options. You can create a
bulleted or
numbered list, change the
text size or
color, apply the
paragraph settings, etc.
Select the text you want to format and use the hotkeys or the
format options from the right-click menu.
Shortcut keys to change selected text:
Ctrl + B - Bold
Ctrl + U - Underline
Ctrl + I - Italic
Ctrl + Shift + S - Strike out
To move text within the same note or from one note to another note, highlight the text, move the pointer over the text, then drag the text to a new location.
▲
To change the look of your note, right-click on it and then select the desired option (change color, font, etc.)
To resize a note, drag an edge or corner of the note to make it larger or smaller.
With the Ctrl + Shift + R shortcut keys you can easily change the color of the selected note.
The default notes settings, including font, size, title color, background color and image, priority and transparency, can be changed in
Notes Settings.
▲
You do not need to save your notes manually. The app saves them automatically when you create notes or make any changes.
You can save an individual note to a file by selecting "Save" from the
Note's Menu (in the upper left corner of the note). This will open a Save dialog and you can select to save the note as rtf pr txt file or save it as a picture. It could be useful if you need to transfer one note to another location or create a copy of your note.
▲
You can easily print out the content of the note if needed.
Click the upper left corner of the note to open the
Note's Menu and select Print or select the note in the
Notes Manager and click "Print".
▲
All notes have different attributes that can be used for searching or filtering, including the date and time of creation, the priority level and title.
How to prioritize notes:
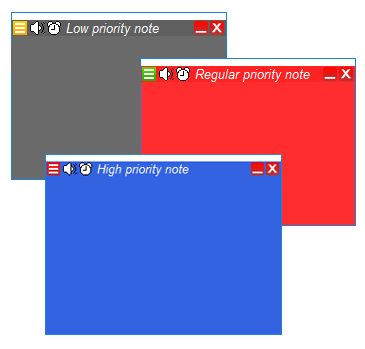
If you create notes with "High" priority, they would stay on top of other windows. It could happen that sticky notes with high priority overlap other windows. If you do not like it, you can change their priority to "Regular" or "Low".
It could happen that notes with the "Regular" or "Low" priority are not fully visible. You can bring them to the top of other windows by clicking on any visible part of the sticky note. If nothing is visible, use the "Show" button in the
Notes Manager or use the Ctrl + Alt + S combination to show all notes.
How to hide notes:
To unclutter your desktop or quickly hide notes content, you can hide your notes by clicking the 'x' icon.
To hide a group of notes, select them in the
Notes Manager and click the "Hide" button.
To quickly hide all of your notes, press Ctrl + Alt + H or select Notes -> Hide All Notes from the Main menu.
To bring your hidden notes back, select them in the
Notes Manager and click Show. To show all hidden notes, press Ctrl + Alt + S or select Notes -> Show All Notes from the
Main menu.
How to minimize notes:
To save your desktop space and hide notes content from prying eyes, you can minimize desktop notes to display their title bars. To quickly minimize a sticky note, click the Minimize icon in the top right corner of the note.
If you need to minimize all sticky notes, open the
Main menu, select Notes -> Minimize All.
▲
► Read a note
Save you time with the 'Read note' option. To read a note, click the
"Read" icon in the upper left corner of the note.
▲
If you have a lot of desktop notes, they can overlap each other. This makes finding a particular note a bit difficult. Using the Find option, you can quickly retrieve any note you need.
To open the "Find" window, click the tray icon and choose Find from the
Main menu.
Type a word or phrase into the Find field and select options for the current search.
You can search in all notes or you can exclude minimized and locked notes from the search.
Check the "Find in titles", "Find in notes" or both option.
To limit the search you can use the "Match whole word" and "Case sensitive" options.
▲
If you do not need a note anymore, you can delete it from your desktop.
Click the upper left corner of the note to open the
Note's Menu and select Delete. In the dialog box, click Yes to confirm.
You can also delete a note or a group of notes though the
Notes Manager - highlight the notes you want to delete and press the "Delete" button.
If you have not disabled the
Recycle Bin option in the
App's settings, deleted notes are moved to the Recycle bin and you can easily restore them.
▲
To protect your notes from being permanently lost in the event of accidental deletion you need to backup your data.
With JustNoteIt, you can recover your notes if you experienced a computer failure or need to revert to an older version of your notes.
There are a couple of ways to do it - you can either create a backup manually by exporting your notes or use the Auto-Backup option.
Auto-Backup
Unless you have disabled the Auto-Backup option, automatic backups are made every time you exit the program or shut down your computer. The backups will be saved in C:\Users\%username%\AppData\Local\Packages\IntemodinoGroups.r.o.JustNoteIt...\LocalCache\Local\JustNoteIt\copy_JustNoteIt_yyyymmddhhmmss.dat.
Manual backup
To create a backup file, right-click the tray icon and choose "Export Notes" from the
Main menu.
This will prompt you for the directory where you would like to save the backup.
▲
Regardless of which backup method you used (either Auto-Backup or by exporting your notes), you should restore your notes using the
Import option from the app's
Main menu.
JustNoteIt Auto-Backups are stored in C:\Users\your user name\AppData\Local\Packages\IntemodinoGroups.r.o.JustNoteIt...\LocalCache\Local\JustNoteIt\copy_JustNoteIt_yyyymmddhhmmss.dat
If you need to import notes from a backup made manually, navigate to the folder where you saved it. Select the .dat file you would like to import and click Open.
▲
To send a note, click the
Note's Menu icon in the upper-left corner of the note and select "Send note".
▲
Ctrl + Alt + M - open or close Notes Manager
Ctrl + Alt + N - create a new note
Ctrl + Alt + S - show all notes
Ctrl + Alt + H - hide all notes
Ctrl + Shift + R - change note color
Ctrl + D - open the font settings window
Ctrl + B - bold
Ctrl + U - underline
Ctrl + I - italic
Ctrl + Shift + S - strike out
Ctrl + Shift + Right Arrow - increase font size
Ctrl + Shift + Left Arrow - decrease font size
Ctrl + Shift + L - create a bulleted list
Ctrl + Shift + L (twice) - create a numbered list
Ctrl + L - left alignment
Ctrl + R - right alignment
Ctrl + E - center alignment
Ctrl + 1 - line spacing = 1 line
Ctrl + 2 - line spacing = 2 lines
Ctrl + 5 - line spacing = 1.5 lines
Ctrl + Tab - Tab
Ctrl + A - Select all
Ctrl + C - Copy
Ctrl + V - Paste
Ctrl + X - Cut
Ctrl + Z - Undo
Ctrl + Y - Redo
Ctrl + Shift + A - Set all caps
▲
Main menu
► Open Main menu
Main menu provides quick access to App's settings, Notes settings, Notes Manager, Export and Import options, Find option and the Recycle Bin.
To access the Main menu, click the JustNoteIt tray icon in the Notification area near the Windows clock at the bottom of the screen.
▲
► Notes
This item in the Main menu provides instant access to the list of actions that could be performed on all of your notes - Show All notes, Hide All Notes, Cascade All, Minimize All.
▲
In the Notes Manager window you can quickly add a new note, show, hide, delete, or print your notes or set an alarm.
To open the Notes Manager, press Ctrl+Alt+M or select "Notes Manager" from the Main menu.
If the
"Open Notes Manager on startup" option is selected, every time you run the program, you will be presented with the Notes Manager window with the list of your notes and reminders. When you run the program first time, this list is empty.
•
New - creates a new note.
•
Show - places selected notes on top.
•
Hide - hides selected notes.
•
Delete - deletes selected notes.
•
Print - prints selected notes.
•
Alarm - allows you to set, change or delete an alarm.
•
Refresh - refreshes the list of notes.
To show or hide an individual note, select it and press Enter or just double-click on it in the list.
▲
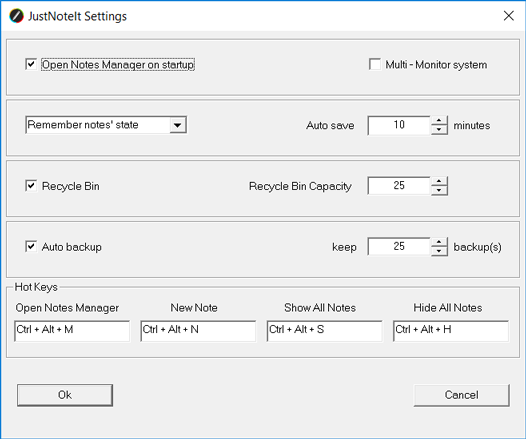
► App's Settings
•
Open Notes Manager on startup
•
Multi-Monitor system - when checked, the app will supports work with several monitors.
• How to show notes on program startup:
Remember notes state
Show all notes
Hide all notes
•
Recycle Bin - when checked, deleted notes are move to the Recycle Bin.
•
Recycle Bin Capacity - specify the number of notes to keep.
•
Auto backup - when enabled, JustNoteIt automatically creates notes backups when you exit the program
•
keep ... backups - specify the number of backups to keep.
Hotkeys:
Open Notes Manager Ctrl+Alt+M
Create a new note Ctrl+Alt+N
Show all notes Ctrl+Shift+S
Hide all notes Ctrl+Shift+H
▲
► Notes Settings
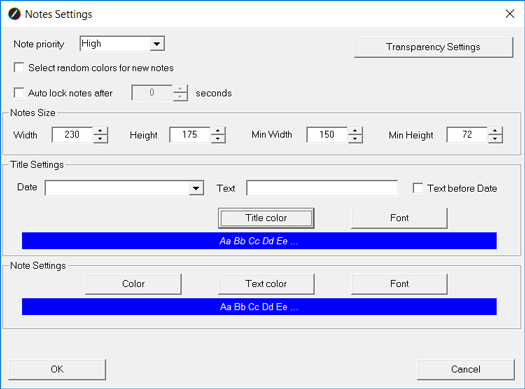
In this window you can predefine notes settings, such as color, font, size, title, priority and transparency. These settings are applied to newly created notes only.
• Note priority:
High - check this priority, if you want to create notes that are always on top of other windows.
Regular - creates notes that behave as standard windows.
Low - check this to create notes on the desktop.
•
Select random colors for new notes - when checked, a random color is used. If this option is not selected, colors selected in the Title Settings and Note Settings below are used.
•
Auto lock notes after ... seconds - auto-locks your notes at the specified interval.
•
Notes size
•
Transparency Settings - choose the level of transparency. When a note is in focus, it has 0% transparency no matter what transparency settings it has.
Title Settings:
You may want to include the certain text and information about the date and time of creation in note's title. In this case you should pre-define the text and the date / date and time format.
If you do not need to insert the data and time, select an empty string. Changes apply to new notes.
•
Date - select the date / date and time format
•
Text - type in the text you want to add to a title.
•
Text before Date - check this option, if you want to insert the text before Date.
•
Title color - choose the title font color.
•
Font - choose the title font and size. You can choose from any font you currently have installed on your computer.
Note settings:
•
Color - choose the note background color.
•
Text color - choose the content font color.
•
Font - choose the content font and size.
▲
► Find
► Recycle Bin
If you enabled the Recycle Bin option, deleted notes are moved to the Recycle bin.
To restore a deleted note, select the Recycle bin option in the Main menu, select the desired note from the list and click Restore.
▲
► Import Notes
This option will be useful if you need to transfer your notes to another computer or restore notes from a backup in case of corrupting your notes database or accidental deleting notes.
▲
Using this option you can to save your notes for backup purposes or for easy transfer amongst different computers.
Selecting the Export option will open the Save dialog where you can select where to save your notes.
▲
► Save
You do not need to save your notes manually. Notes are saved automatically every 15 minutes. This interval can be changed in
App's settings.
You can also force saving by clicking Save in the Main menu.
▲
Note's Menu
► Note's Menu options
The Note's Menu can be accessed from any note by clicking on the icon in the upper-left corner.
It provides quick access to different actions you can perform on an individual note such as 'Lock', 'Save', 'Duplicate', 'Import file', 'Delete', 'Print', 'Send' and changing priority, transparency, size.
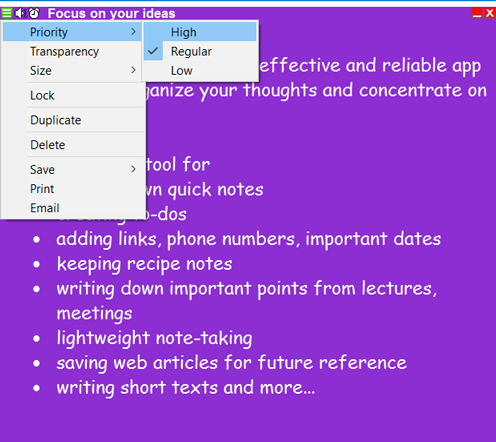
Priority
High - select this level to have a note always on top of other windows.
Regular - standard windows order.
Low - select this level to have a note on the desktop. The note will be placed on top of other windows only when you show it and it is in focus.
Transparency
Displays the current opacity level. Use the slider to change the note's transparency.
Size
To resize a note, you can drag an edge or corner of the note.
Set size - specify size in pixels.
Maximize - maximize a note.
Lock
Locks a note to prevent accidental editing or deleting. Locked notes support the read-only mode.
Save
You can save an individual note to a file by selecting 'Save' from the Note's Menu. This will open a Save dialog and you can select to save the note as rtf/txt file or save as picture. It could be useful if you need to transfer one note to another location or create a copy of your note.
Duplicate
Duplicates a note.
Delete
Opens the Delete dialog window. If you do not need a note anymore, click Yes to confirm deletion.
To delete a group of notes, use the
Notes Manager.
Print note
Opens the Print window.
Email
Using this option you can send your note via email.
▲
Note's context menu
► How to edit and customize notes
There are many ways to format and customize your note.
To customize a sticky note (change color, font), right-click the note and then select the desired option from the context menu.
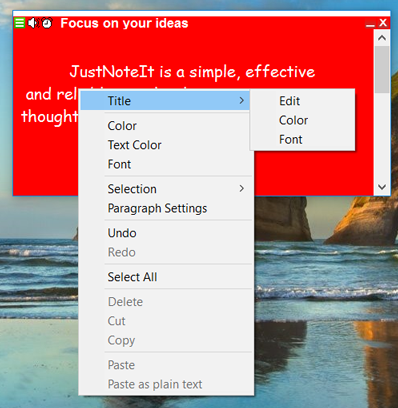
Title
Select "Title" from the context menu to edit and customize title area:
- Edit - select to edit the text.
- Color - use this to set the font color of the title.
- Font - choose the title font and size.
To edit a title, double-click the title area or right-click the title area and select Title -> Edit. When you are done editing, press 'Enter'.
Note area
- Color - select the note background color.
- Text color - use this option to set the font color.
- Font - choose the font and size.
- Paragraph Settings:
- Line spacing
- Alignment
- Bulleted and numbered lists
Select the text you want to format and use the hotkeys combinations listed below or select format options from the right-click menu.
Font size:
Increase font size - Ctrl+Shift+Right Arrow
Decrease font size - Ctrl+Shift+Left Arrow
Or you can highlight the text, right-click the note, choose Selection and then Text Color or Font.
Create a bulleted list:
- Press Ctrl+Shift+L or place the cursor where you want to begin a bulleted list.
- Right-click the note, select Paragraph Settings and select 'Bulleted' from the 'Bulleted and Numbered list' drop-down menu.
- Start typing the text for the first item. To create the next item press Enter.
To end the bulleted list press Enter twice.
Create a numbered list:
- Press Ctrl+Shift+L twice or place the cursor where you want to begin a numbered list.
- Right-click the note, select Paragraph Settings and select the format you need from the 'Bulleted and Numbered list' drop-down menu.
- Start typing the text for the first item. To create the next item press Enter.
To end the numbered list press Enter twice.
Text alignment:
Right-click the note, select Paragraph Settings and select Left, Right or Center from the Alignment drop-down menu or use the hotkeys.
- Left alignment Ctrl+L
- Right alignment Ctrl+R
- Center alignment Ctrl+E
Line spacing:
Right-click the note, select Paragraph Settings and select the type of line spacing or use hotkeys.
Ctrl+1 Line spacing = 1 line
Ctrl+2 Line spacing = 2 lines
Ctrl+5 Line spacing = 1.5 lines
▲
 EN
EN